Friday, January 29, 2010

Pizza Dough


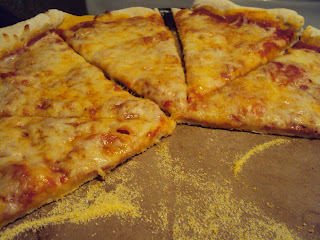
I think I've found a good recipe for pizza dough! I REALLY liked this one and the next time I made it, I added some garlic salt and Italian seasonings. I will add a bit more next time, not quite enough to taste. I wasn't sure just how much to put in so I just dumped. I really like just dumping in spices and ingredients, SOOOO much fun!!! You NEVER know how it's gonna try out! That's probably why when I make something the second time around, it never tastes the same as the first time! :)


Mix flour, salt and yeast together, then make a well in the center of flour...


Add the warm water...


Mix together... You could knead this, but I didn't have the time to knead it by hand! My KitchenAid mixer worked just fine! :)


Next, add the olive oil and mix again...


Let rise in a warm, draft free place until doubled in size. This is almost triple in size! I cheat, I warm my oven up for about 10 minutes, then turn it off. Then I put in my dough that needs to rise... That way it is nice and warm! Ready to go! (make sure it isn't too hot though! Or it will cook the dough and not rise it like you want!)


Sprinkle your HOT stone or baking sheet with yellow cornmeal


Roll it nice and thin on LIGHTLY floured surface... You don't need a whole lot of flour when rolling this out...
Then place on already hot stone/pan... On top of the yellow cornmeal


Put sauce all over, leave enough room around the edges for your crust!


The kiddos wanted pepperoni, so I put some pepperoni on...


Sprinkle with mozzarella cheese! The trick, don't over load it, your crust won't cook if it is too heavy!


Cook until cheese is all nice and melted!


Pizza Dough


4 1/4-1/2 cups flour (you need atleast 4 cups, you may need to add up to 1/2 cup more though)
pinch of salt
2 1/4 teaspoons yeast

Mix all together, make a well in the middle and add 12 oz WARM water, mix for a minute, then add 2 oz olive oil. Mix until you get a nice dough. (Not sticky or it won't be good!)
Place in bowl (or if you are using mixer, keep it in bowl) cover with a dish towel and place in a nice and warm, draft - free place. Let it rise for 30-40 minutes. (Remember, I like to let it rise for an hour! But you can only do it for 30 minutes if you are running short one time!).
Preheat your oven to 475 degrees. Make sure you put your pans in the oven as it is warming up! You want your pans to be HOT when you put the dough on them!
Once the oven has reached the temp, pull one pan out and sprinkle yellow cornmeal all over.
Remove dough from bowl once it has risen, place a small amount of flour on counter and knead the dough for a minute or two. Break in half and roll the first half to the size you want.
Place on pan/stone and then add the sauce and the rest of the ingredients you want!
Continue with other half. Place in oven and bake for 10-15 minutes or until cheese is melted!


*The longer you let your dough rise, the BETTER!!! :) First time I made it, I let it rise for just over an hour, YUMMY! The second time I only let it rise 45 minutes, you could definitely taste the difference between to the two. Can't really say what it was, but it was different! Not bad, but gonna make sure it sits for atleast an hour! :)
Also, add spices to this before you add the water. I used garlic salt and Italian seasonings.. yummy...
Also, if you make it into a pizza, you can use string cheese, put it around the crust and then fold the crust over. You've got your very own stuffed crust pizza!
You could even make a garlic butter (with softened butter and garlic salt) and brush it over the pizza crust after it's done baking. Very tasty! :)
I like to use spaghetti sauce for my pizza sauce. I use the non-chucky regular kind. I never usually have pizza sauce on hand and always have use for spaghetti sauce! :)

Wednesday, January 27, 2010

Cheesy Garlic Biscuits


YUMMY, that's all I'm gonna say!!

You take biscuits, cheese and garlic, and WOW!!!! It's SUPER delish!!!!


Two cups biscuit mix, or whatever type of baking mix you use.


Add the milk, stir it up.
Then add the cheese and garlic salt


Place on stone, or cookie sheet.


While the biscuits are baking, combine butter/margarine with garlic salt and parsley flakes.


Stir it up!


Remove from oven when edges are nice and golden brown


Place butter over the tops of all biscuits and if you have more, go over them again!


Yummy, look at all that butter and garlic goodness!!!


Finally, ENJOY!!! Eat them while they are warm, it's better that way!


Cheesy Garlic Biscuits

2 cups biscuit mix, or whatever type of baking mix you use
1/2 - 3/4 cups milk
1 tsp garlic salt
1 cup shredded cheddar cheese

Mix the baking mix and milk together, until it's the consistency you want. Then add the garlic salt and cheese.
Drop round tablespoons of the biscuit mix onto a stone or baking sheet. Place in preheated 375 degree oven for 15-25 minutes. (depending on your oven)
Take out and immediately spread the butter mixture over top.

Butter for Tops of Biscuits

3 tablespoons spreadable butter or margarine (I usually have the country crock stuff, so I use that kind, but whatever kind will work!)
2 teaspoons to 2 tablespoons garlic salt
1 teaspoon parsley flakes

Combine these all together and put on top of biscuits AS SOON AS THEY COME OUT OF THE OVEN!!!! Serve warm!

*Depending on how much you like garlic, start off with just the 2 teaspoons in the butter. The next time if you think you need more, add more! We LOVE garlic, so I use anywhere between the 1 - 2 tablespoons of garlic salt! :)


Tuesday, January 26, 2010

Baked Penne


Okay, this is a little later than I wanted to post, BUT I had to make it again tonite! I didn't measure ANYTHING when I made it for the membership class Sunday,(and I had a super fussy baby that needed my attention...) so I thought I better make it again so I can put down the amounts! :)


Bring your pasta to a boil and boil for 10 minutes. I wouldn't do it much longer, you could even do it for 7. Remember, you will be baking it for an hour, so if you cook it til it is really soft, by the time you are ready to eat it, it will be mushy!


Put pasta back in pan and start to add everything else!


Add tomato sauce


Add the sour cream... (I usually stir after I've added the sour cream)


Add the shredded cheddar cheese, oregano, garlic salt, chili powder and stir


This is the fun part, where you try it to make sure you have just the right amount of spices in it! :)


Place in pan, I used an 8x8 stone.


Then add MORE cheese! You could add more than I did, but I have to be careful with the milk/cheese products for certain members in my family! :)
Cover with foil and place in 350 degree oven for 1 hour.


Yummy!!!


Baked Penne

1 16oz box penne pasta (cooked and drained)
1 lb hamburger or turkey (or you can omit this if you want)
15 oz and 8oz can of tomato sauce
1 cup sour cream
1 cup shredded cheddar cheese
1 tsp oregano
3-4 tsp garlic salt
3-4 tsp chili powder

Cook and drain the penne pasta, put bake in pan. Add hamburger/turkey, (only if you want to add it), both cans tomato sauce, sour cream, cheese, oregano, garlic salt and chili powder. Mix all together. Place in a baking dish, top with a little bit of shredded cheddar cheese. Cover with foil and bake in a preheated 350 degree oven for one hour.

* I don't always add the meat, I don't always have it...
You can add more or less tomato sauce, just depends on how "saucy" you want it.
You could use different kinds of cheese as well. I just usually always have the cheddar on hand, so that's what I used.
You can add more or less of the spices...
If you want it more spicy you could add red chili pepper.
Also, you may want to only add half the spices, then taste it after it's all mixed together. If you think it needs more, then add the rest or more if you want. I don't usually measure out the spices, I just dump, then try it and see if it needs more. So, if you don't like spicy or garlic things, just do half of what it calls for! :)
I like to serve this with my cheesy garlic biscuits, YUMMY!!! :P

Monday, January 25, 2010

Candy Bar Cake


This was a HUGE hit at the membership class! I must admit, I tried it and LOVED it too!!! :) It really doesn't take very long to make!


I didn't take any pictures while mixing up the cake mix, you don't really do much anything different, just add sour cream and an extra egg... I know, sour cream, but it was soooo good and SUPER moist!

After cakes are baked, cool them for 10 minutes in pan, then flip out onto wire rack to cool completely.

Cut each cake in half.


Place on layer of cake on plate and add some icing...


The first layer of candy I used was twix... Cut in half, then chop it all up! Sprinkle on top of icing.


Place another cake layer on top of the candy covered icing, then spread icing all over the top of that cake!


Next candy I used was Reese's Peanut Butter Cups...


Another cake layer, and then, yep, you guessed it, more icing!


Next layer I used Snicker's bars! YUMMY!!!!!!!


Add the last cake layer and the last little bit of icing!


Add the Hershey's on the top.


Candy Bar Cake

1 package (18 1/4 oz) devil's food cake mix
1 cup sour cream
4 eggs
1/3 cup vegetable oil
1/4 cup water
3 containers (16 oz) white frosting
1 Butterfinger candy bar
1 Snickers candy bar
1 Heath candy bar
4 Hershey's candy bars

Preheat oven to 350 degrees. Grease and flour two 9 inch round cake pans.
Beat cake mix, sour cream, eggs, vegetable oil and water together. Spread batter into prepared pans.
Bake for 30-35 minutes or until toothpick inserted in middle comes out clean. Cool in pans for 10 minutes, then remove from pans and cool completely on wire racks.
Cut each layer in half. Place one cake layer on plate, spread with prepared white icing/frosting. Add cut up butterfinger candy bar. Repeat each layer with the different candy bars.
Break the Hershey's bar into pieces, stand pieces around edge. Or any design you wish.

*This was super easy and very tasty!!!
You can use any kind of candy bar... I used twix, reese's peanut butter cups, and snickers bar. Then the hershey bar on top.
I also cut the top part of the cakes to even them out...
I love this because it looks like it could be an expensive cake from your bakery, but it really isn't! You can make it pretty cheap!!! :)
Enjoy!!!