Trying to come up with some really good, easy adn tasty recipes! But yet, cheap! We are trying to save every little penny around here and what better way by eating beans and rice, right? ;) But not just the normal beans and rice, tasty ones!
Ok, well, the kids and I could eat beans and rice all the time, but my hubs, he needed some extra spice for it! But it's all good! ;)
I think next time I make the cilantro lime rice, I will add a bit more limes, I didn't have enough, so I just used what I had! And maybe a bit more cilantro... ;)
I already had some black beans ready to go, so I just added all the other things to make a Mexican Rice Bowl... So you are getting 2 recipes in 1!!! :)
I thought I took pics of the rice and the Mexican bowl, but I guess i didn't!
Mexican Rice Bowl
Cilantro Lime Rice
Black beans
Diced tomatoes
Chopped cilantro
Avocado slices (I just took an avocado and mashed it up)
Fresh lime juice
Directions:
1. Add cilantro lime rice to a bowl or plate. Top with black beans, tomatoes, cilantro, and avocado slices. Squeeze fresh lime juice over the entire dish. Serve warm.
Note-I didn’t include ingredient measurements because I never measure. This recipe is that easy! I like to make individual bowls so everyone can have add their favorite toppings. Enjoy!
AND here's how to make the rice! :)
Cilantro Lime Rice
1 cup uncooked long-grain white rice
1 teaspoon butter
2 cloves garlic, minced
2 teaspoons freshly squeezed lime juice
1 (15 ounce) can vegetable broth
1 cup water
1 tablespoon freshly squeezed lime juice
2 teaspoons granulated sugar
4 tablespoons fresh chopped cilantro
Directions:
In a a saucepan combine rice, butter, garlic, 2 teaspoons of lime juice, broth and water. Bring to a boil. Cover and cook on low 15-20 minutes, until rice is tender. Remove from heat. In a small bowl, whisk together lime juice, sugar, and cilantro. Pour over hot cooked rice and mix in as you fluff the rice. Serve warm.
Makes about 3 cups cooked rice
(I tripled this recipe! And I didn't have any vegetable broth, so I just used all water.)
Going to be making this one again for sure! ;) Just a different flavor, but good! I also used jasmine rice for this. It's all I get anymore! :)
Enjoy!
Again, sorry that they aren't any pictures for these recipes! It's very colorful! :) You can also use chopped red onion in the Mexican Bowl! :) Really, for the Rice Bowl, anything could go! It's whatever you like and what you have on hand! :)
Tuesday, May 3, 2011

Saturday, April 30, 2011
Pizza Wheels
These were a HIT and so good! They weren't really hard to make, and the bonus, you don't have to wait to let your dough rise! :) I am always a bit unsure of making a dough that doesn't need to rise for my pizza, it just never turns out right, the dough seems too heavy. But this stuff was PERFECT!!! I doubled the recipe, but think for next time, I will have to triple it! ;)
You can still make whatever flavors you want! I did a ham and cheese, a ham, cheese and mushroom, and then I did a spinach and cheese, oh, and I did a cheese one by itself. They all were so good!
I think next time I will add a bit of garlic salt to the dough. OR make a garlic butter dipping sauce, that would be soooo good!!! :D
This is a recipe that your kids could totally help you out with! The mixing of the dough, rolling it out, getting all the ingredients on the wheels and then rolling it up.
Oh, one thing to remember, I placed foil down on my pan, easier clean up, but I didn't spray the foil, you WILL want to spray your foil before placing your pizza wheels on it! It didn't stick too bad, but it would be easier to get off if sprayed! ;)
 Take a part of your dough, in my case, this was a fourth of it... ;)
 Roll it out into a rectangle, again, in my case, as best as you can! ;)
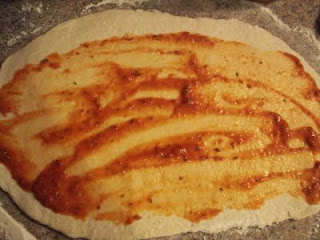 Spread some pizza sauce on it... I used spaghetti sauce, i had it on hand. :)

Lay out some ham
 Sprinkle with cheese
 Roll it up
 And then cut! :)
 Place on a foil covered pizza pan
 another one i did was ham, mushroom and cheese...
 And another that I LOVED was spinach and cheese! ;)
 And then I did an all cheese one! :)
 Here are all of them on the pan...
 Here they are all done! They puffed up a bit and they were PERFECT!!! :) Super yummy if I do say so myself! :)
 I ate most of the spinach ones, LOVED them!!! I think I will try and do spinach, mushroom, and cheese one! ;)
Pizza Wheels
2 2/3 cup all purpose flour ( I don't see why you couldn't use whole wheat too! ;)) You will need a little bit extra for rolling out
A dash of salt
1 1/2 teaspoons (heaping) active dry yeast
1 cup warm milk
2 tablespoons olive oil (I used coconut oil)
Spaghetti sauce, or your sauce of choice.. ;)
Ingredients to place inside your pizza wheels, like, ham, cheese, mushrooms (thinly sliced), onions, green pepper, diced small, baby spinach, etc... ;)
Preheat oven to 350 degrees.
Combine milk and yeast, stir just a bit. Let sit for 5 minutes, your yeast mixture should be a bit foamy by now. Add oil and stir.
Add flour, and salt and stir until just combined. This is where the fun starts, you get your hands into the mixture and knead until no longer sticky.
Divide your dough into 2 equal parts. Roll out into a 12x18 rectangle and spread your sauce over the top. Place your pizza toppings of choice on top and then top with cheese. Roll up and cut into 16 slices.
Place on foil covered cookie sheet and bake 25 minutes, or until golden brown and done.
We love pizza around here, and sometimes doing the same old same old gets a little old. Not that I fix it alot, but still, I like to keep things fun and easy around here! This is for sure a hit and will be making it again! :) ENJOY!!!!
You can still make whatever flavors you want! I did a ham and cheese, a ham, cheese and mushroom, and then I did a spinach and cheese, oh, and I did a cheese one by itself. They all were so good!
I think next time I will add a bit of garlic salt to the dough. OR make a garlic butter dipping sauce, that would be soooo good!!! :D
This is a recipe that your kids could totally help you out with! The mixing of the dough, rolling it out, getting all the ingredients on the wheels and then rolling it up.
Oh, one thing to remember, I placed foil down on my pan, easier clean up, but I didn't spray the foil, you WILL want to spray your foil before placing your pizza wheels on it! It didn't stick too bad, but it would be easier to get off if sprayed! ;)
 Take a part of your dough, in my case, this was a fourth of it... ;)
 Roll it out into a rectangle, again, in my case, as best as you can! ;)
 Spread some pizza sauce on it... I used spaghetti sauce, i had it on hand. :)
Lay out some ham
 Sprinkle with cheese
 Roll it up
 And then cut! :)
 Place on a foil covered pizza pan
 another one i did was ham, mushroom and cheese...
 And another that I LOVED was spinach and cheese! ;)
 And then I did an all cheese one! :)
 Here are all of them on the pan...
 Here they are all done! They puffed up a bit and they were PERFECT!!! :) Super yummy if I do say so myself! :)
 I ate most of the spinach ones, LOVED them!!! I think I will try and do spinach, mushroom, and cheese one! ;)
Pizza Wheels
2 2/3 cup all purpose flour ( I don't see why you couldn't use whole wheat too! ;)) You will need a little bit extra for rolling out
A dash of salt
1 1/2 teaspoons (heaping) active dry yeast
1 cup warm milk
2 tablespoons olive oil (I used coconut oil)
Spaghetti sauce, or your sauce of choice.. ;)
Ingredients to place inside your pizza wheels, like, ham, cheese, mushrooms (thinly sliced), onions, green pepper, diced small, baby spinach, etc... ;)
Preheat oven to 350 degrees.
Combine milk and yeast, stir just a bit. Let sit for 5 minutes, your yeast mixture should be a bit foamy by now. Add oil and stir.
Add flour, and salt and stir until just combined. This is where the fun starts, you get your hands into the mixture and knead until no longer sticky.
Divide your dough into 2 equal parts. Roll out into a 12x18 rectangle and spread your sauce over the top. Place your pizza toppings of choice on top and then top with cheese. Roll up and cut into 16 slices.
Place on foil covered cookie sheet and bake 25 minutes, or until golden brown and done.
We love pizza around here, and sometimes doing the same old same old gets a little old. Not that I fix it alot, but still, I like to keep things fun and easy around here! This is for sure a hit and will be making it again! :) ENJOY!!!!
Friday, April 29, 2011
Strawberry Lime Sorbet
I just made this tonite, oh yummy!!!! :)
I found out last nite, which I knew, but I forgot, that I am lactose intolerant right about 9 pm and on and then if I have milk too early in the morning! My tummy hurt so bad last nite, I know, you REALLY wanted to know that didn't you? ;)
So, tonite we put the kids to bed, and my hubs and I wanted a snack, but obviously not anything that has milk! We used to eat ice cream almost every nite, but we haven't bought any for about 6-9 months! I've been making it in my Vita Mix, and I forgot about my little problem until last nite... Again, a bit TMI maybe? ;)
So, I was looking through my Vita Mix cookbook and found this recipe... SOOOOO good!!! FOR SURE going to be making this again!!! :D

All ingredients in my Vita Mix

All done, I didn't have quite enough strawberries, I buy them in bulk, so I didn't have exactly 1 pound.. But it still turned out, really good if I do say so myself! This would be GREAT after some supper on the grill, or a late nite snack, like I did! ;)
Strawberry Lime Sorbet
1 cup water
1/4 cup sugar
1/2 lime, peeled
1 pound strawberries
Place all ingredients in your Vita mix (you can try this in a regular blender, if you think it will handle it! ;)) in the order listed. Select variable 1, then quickly turn to 10, then turn to high. Use tamper to press ingredients down into the blades. In about 30-60 seconds you will hear the motor change, and four mounds should appear. Turn it off because if you leave it going, it will turn to a sorbet shake and not just sorbet! ;)
Enjoy! REALLY easy and delish!!!
This is from my Vita Mix recipe book, I didn't write down the instructions word for word... ;)
I found out last nite, which I knew, but I forgot, that I am lactose intolerant right about 9 pm and on and then if I have milk too early in the morning! My tummy hurt so bad last nite, I know, you REALLY wanted to know that didn't you? ;)
So, tonite we put the kids to bed, and my hubs and I wanted a snack, but obviously not anything that has milk! We used to eat ice cream almost every nite, but we haven't bought any for about 6-9 months! I've been making it in my Vita Mix, and I forgot about my little problem until last nite... Again, a bit TMI maybe? ;)
So, I was looking through my Vita Mix cookbook and found this recipe... SOOOOO good!!! FOR SURE going to be making this again!!! :D

All ingredients in my Vita Mix

All done, I didn't have quite enough strawberries, I buy them in bulk, so I didn't have exactly 1 pound.. But it still turned out, really good if I do say so myself! This would be GREAT after some supper on the grill, or a late nite snack, like I did! ;)
Strawberry Lime Sorbet
1 cup water
1/4 cup sugar
1/2 lime, peeled
1 pound strawberries
Place all ingredients in your Vita mix (you can try this in a regular blender, if you think it will handle it! ;)) in the order listed. Select variable 1, then quickly turn to 10, then turn to high. Use tamper to press ingredients down into the blades. In about 30-60 seconds you will hear the motor change, and four mounds should appear. Turn it off because if you leave it going, it will turn to a sorbet shake and not just sorbet! ;)
Enjoy! REALLY easy and delish!!!
This is from my Vita Mix recipe book, I didn't write down the instructions word for word... ;)
Thursday, April 28, 2011
Banana, Apple, Orange Smoothie
Well, it's been another 2 weeks, so yet, here comes another round of new recipes and menus! ;)
I know, I am so far behind...
I'm in the works of putting together a "class" to help you put together your own 2 week menu, to fit your lifestyle and your tastes! ;) I don't have everything put together just yet, but once I figure most of it out, I will post a date or a few dates and we will go from there! :)
Those of you who are out of town, I am working on that problem, so we will be able to include you as well! :)
Here's a SUPER easy and SUPER delish smoothie!
I don't have any pics to go with this, but it is really good!
Banana, Orange and Apple Smoothie
2 banana's
2 apples (cored and cut in half)
2 oranges (peeled and in half)
Place all fruit in a blender or vita mix and blend. You can add ice before blending and it will be thicker.
Pour into glasses and enjoy!!! :)
This makes enough for my 4 kids, not a huge tall glass, but a good size one! ;)
I know, I am so far behind...
I'm in the works of putting together a "class" to help you put together your own 2 week menu, to fit your lifestyle and your tastes! ;) I don't have everything put together just yet, but once I figure most of it out, I will post a date or a few dates and we will go from there! :)
Those of you who are out of town, I am working on that problem, so we will be able to include you as well! :)
Here's a SUPER easy and SUPER delish smoothie!
I don't have any pics to go with this, but it is really good!
Banana, Orange and Apple Smoothie
2 banana's
2 apples (cored and cut in half)
2 oranges (peeled and in half)
Place all fruit in a blender or vita mix and blend. You can add ice before blending and it will be thicker.
Pour into glasses and enjoy!!! :)
This makes enough for my 4 kids, not a huge tall glass, but a good size one! ;)
Tuesday, April 5, 2011
Menu
So I made out my menu again today. It's from tomorrow, Wednesday the 6th to Wednesday the 20th.
If I am honest, sometimes I just hate sitting down and writing it all out and planning it! :\ I want to try and keep things simple, but yet not the same old same old thing week after week. Sure, my lunches are the same quite a bit, but even this menu plan that I just made, has different options for lunch! ;)
I am trying to think how much I spent this time.. I got 35 items at Aldi's for 50 bucks. Then went to BJ's and got some stuff, it was a bit more, but of course, I got bulk items. So let's just say if I broke it down and with how much I need of that item for this menu plan, let's say I spent 40 bucks. So, I'm at $90. I had to hit one more store on the way home and spent another 45 bucks. So... For 2 weeks worth of breakfast, lunch, dinner and one snack per day, I spent $135. Ok, so I didn't get it right at $100, but seriously, I am feeding a family of 6 all 3 meals for 2 weeks, and I spent $135! I just remembered, I do need to get some ground beef, and if I get that at BJ's, that's another $15. But I will only need a small portion, so say I am only using $5, so I am still at $140 for 2 weeks!
Again, I didn't plan a whole lot with meat, only a few recipes. One has ground beef and the other has chicken tenders.
Again, when making a menu, you don't HAVE to fix it that day.. So say what i have down for Thursday nite dinner, I want for Wednesday, go for it!
Also, right after I make my menu I try and shop for everything in one day if possible! Sometimes i do need to go out and get more milk or fresh fruit, but for the majority, I get it all. I may hit the Farmer's Market to get a few fresh items, but you can add about another $50 to that total for the next 2 weeks to get some of that fresh fruit. ;) So all in all, I kept it under $200 for 2 weeks! :D That gets me totally excited! With the way prices are going with gas, and even food, the cheaper I can get, the happier I am! And I am not going to make some nasty bland food, this is some really flavorful food!
I will post the menu tomorrow, and then a recipe or two as well. I have some major catching up to do! Just seems like by the time we get school work done, church, and grocery shopping, I am done in! We have been enjoying the nice weather and playing and working outside!
What's your favorite food to eat?
Enjoy your week!!! :D
If I am honest, sometimes I just hate sitting down and writing it all out and planning it! :\ I want to try and keep things simple, but yet not the same old same old thing week after week. Sure, my lunches are the same quite a bit, but even this menu plan that I just made, has different options for lunch! ;)
I am trying to think how much I spent this time.. I got 35 items at Aldi's for 50 bucks. Then went to BJ's and got some stuff, it was a bit more, but of course, I got bulk items. So let's just say if I broke it down and with how much I need of that item for this menu plan, let's say I spent 40 bucks. So, I'm at $90. I had to hit one more store on the way home and spent another 45 bucks. So... For 2 weeks worth of breakfast, lunch, dinner and one snack per day, I spent $135. Ok, so I didn't get it right at $100, but seriously, I am feeding a family of 6 all 3 meals for 2 weeks, and I spent $135! I just remembered, I do need to get some ground beef, and if I get that at BJ's, that's another $15. But I will only need a small portion, so say I am only using $5, so I am still at $140 for 2 weeks!
Again, I didn't plan a whole lot with meat, only a few recipes. One has ground beef and the other has chicken tenders.
Again, when making a menu, you don't HAVE to fix it that day.. So say what i have down for Thursday nite dinner, I want for Wednesday, go for it!
Also, right after I make my menu I try and shop for everything in one day if possible! Sometimes i do need to go out and get more milk or fresh fruit, but for the majority, I get it all. I may hit the Farmer's Market to get a few fresh items, but you can add about another $50 to that total for the next 2 weeks to get some of that fresh fruit. ;) So all in all, I kept it under $200 for 2 weeks! :D That gets me totally excited! With the way prices are going with gas, and even food, the cheaper I can get, the happier I am! And I am not going to make some nasty bland food, this is some really flavorful food!
I will post the menu tomorrow, and then a recipe or two as well. I have some major catching up to do! Just seems like by the time we get school work done, church, and grocery shopping, I am done in! We have been enjoying the nice weather and playing and working outside!
What's your favorite food to eat?
Enjoy your week!!! :D
Thursday, March 24, 2011
Basic Baked Beans
(I have no pictures for this post as well! :( I was going through my recipes and saw that I hadn't posted this one, and have NO clue where the pics are for this, but let me tell you, I DO KNOW for a FACT that I will be making this again! This would be GREAT with hamburgers or hot dogs for a cook out! Yummy! I'm thinking I am going to have to make this, and soon!!! :D)
I actually remembered to soak the beans last nite! :) Also, since I was up early, I went ahead and started cooking them. It took about 2 hours to cook and let me tell you, the house smelled sooooo good! I don't know what it is about beans cooking, but I just LOVE the smell! ;) Maybe it's because I remember my mom cooking them and when she did, she always cooked something good! Most likely a recipe that was my Aunt and Uncles, so it was G-O-O-D!!!!!!!! ;)
I served this with rice. It as really good! The kiddos all asked for more, so that's a plus in my book! :)
I really liked the fact that I could just put this in the oven and pretty much forget about it for 4 hours! I am pretty sure you could put this in the crockpot, but this was soo good in my cast iron pot just baking in the oven! Plus, it made the house smell really good too!
This recipe calls for navy beans, which I thought I had, but I couldn't find them. So I just soaked 2 pounds of pinto beans. I knew the recipe for the next nite would have pinto beans, so now, one step done for tomorrow's recipe! ;)
Basic Baked Beans
Soak overnite
1 pound navy beans and enough water to cover and then a bit extra. Your beans will swell up, so you want to make sure there is enough water. ;)
In the same liquid that you soaked the beans in, simmer for about 2 hours. Bring it to a boil and then turn way down to simmer for an hour and a half to 2 hours.
Drain, reserving the liquid.
Preheat oven to 275-300 degrees.
Combine in 2 quart casserole:
cooked beans
1/2 cup molasses
1/3 cup ketchup
1 teaspoon mustard
2 teaspoons salt
1/4 teaspoon pepper
1 onion, chopped
2 slices bacon, chopped, or 1/4 pound salt pork (optional)
reserved bean liquid to cover
Stir it all to combine.
Bake 4-8 hours adding liquid occasionally if necessary. Cover during first half of baking time, then uncover.
*I didn't have any bacon, so I didn't add any meat. I think it would be GREAT with some bacon flavor in this!
The recipe also calls for 1/4 cup ketchup, but I added a bit more.
And like I said at the top, I didn't have any navy beans, so I used pinto. Tasted just fine to me! ;)
Enjoy this super easy meal! It does take time, but really, the only time is waiting for the beans to soak and then to cook in the oven!
I actually remembered to soak the beans last nite! :) Also, since I was up early, I went ahead and started cooking them. It took about 2 hours to cook and let me tell you, the house smelled sooooo good! I don't know what it is about beans cooking, but I just LOVE the smell! ;) Maybe it's because I remember my mom cooking them and when she did, she always cooked something good! Most likely a recipe that was my Aunt and Uncles, so it was G-O-O-D!!!!!!!! ;)
I served this with rice. It as really good! The kiddos all asked for more, so that's a plus in my book! :)
I really liked the fact that I could just put this in the oven and pretty much forget about it for 4 hours! I am pretty sure you could put this in the crockpot, but this was soo good in my cast iron pot just baking in the oven! Plus, it made the house smell really good too!
This recipe calls for navy beans, which I thought I had, but I couldn't find them. So I just soaked 2 pounds of pinto beans. I knew the recipe for the next nite would have pinto beans, so now, one step done for tomorrow's recipe! ;)
Basic Baked Beans
Soak overnite
1 pound navy beans and enough water to cover and then a bit extra. Your beans will swell up, so you want to make sure there is enough water. ;)
In the same liquid that you soaked the beans in, simmer for about 2 hours. Bring it to a boil and then turn way down to simmer for an hour and a half to 2 hours.
Drain, reserving the liquid.
Preheat oven to 275-300 degrees.
Combine in 2 quart casserole:
cooked beans
1/2 cup molasses
1/3 cup ketchup
1 teaspoon mustard
2 teaspoons salt
1/4 teaspoon pepper
1 onion, chopped
2 slices bacon, chopped, or 1/4 pound salt pork (optional)
reserved bean liquid to cover
Stir it all to combine.
Bake 4-8 hours adding liquid occasionally if necessary. Cover during first half of baking time, then uncover.
*I didn't have any bacon, so I didn't add any meat. I think it would be GREAT with some bacon flavor in this!
The recipe also calls for 1/4 cup ketchup, but I added a bit more.
And like I said at the top, I didn't have any navy beans, so I used pinto. Tasted just fine to me! ;)
Enjoy this super easy meal! It does take time, but really, the only time is waiting for the beans to soak and then to cook in the oven!
Orange Bread
So... I didn't make our breakfast last nite, but since I was up at the crack of dawn, no wait, scratch that, BEFORE the crack of dawn, I just made it this morning! This orange bread was sooo good!!! The only downfall of this was that i only have 3, nope, scratch that, 2 slices left! We had this with an orange, strawberry, and banana smoothie! It was soooo good!
It was really easy to make, seriously only took about 10 minutes to throw together! It took right at an hour to bake, but the smell was intoxicating! The kids woke up to the smell of fresh bread and could NOT wait to get their hands on a piece, or two, or three! ;)
I really am trying to do better to make some hot for the kids for breakfast, plus a smoothie. Nothing wrong with cold cereal, but something hot and homemade fills them up more and gets them through the day a bit better!
 Blend the orange juice, milk, coconut oil and egg in bowl...
 Add all other dry ingredients plus the orange peel... (save the orange, either eat it with the bread, of finish peeling it and throw it in your smoothie for the morning! ;))
 Stir it all up!
 Pour in loaf pan and sprinkle with cinnamon and sugar... and bake!
 All done, boy did it smell GOOD!! SOOOO wish this was a scratch and sniff picture! You'd be running to your kitchen to make up a loaf right now! ;)

 The top, sooo good! I think I liked the top part the best! ;)
Orange Bread
1 cup whole wheat flour
2 cups white flour
1/2 cup sugar
2 tablespoons grated orange peel
2 teaspoon baking powder
3/4 cup fresh orange juice
1/2 cup milk
1/2 cup cooking oil (I used coconut oil)
1 egg beaten
Top of bread you will need:
1 tablespoon sugar
1/2 teaspoon cinnamon
Preheat oven to 350 degrees.
Combine orange juice, milk, oil and egg in a medium bowl. Whisk until smooth. Add both flours, sugar, orange peel and baking powder. Stir until well moistened. Pour batter into a greased loaf pan. Sprinkle with the sugar and cinnamon.
Bake 60-05 minutes or until toothpick inserted comes out clean.
*This is soooo good! I got it from my MCC, More with Less. It calls for 3/4 cup sugar, but I only put in 1/2 and it was just fine! :) also calls for cooking oil, and I substituted coconut oil. A for sure make again!!! ;)
It was really easy to make, seriously only took about 10 minutes to throw together! It took right at an hour to bake, but the smell was intoxicating! The kids woke up to the smell of fresh bread and could NOT wait to get their hands on a piece, or two, or three! ;)
I really am trying to do better to make some hot for the kids for breakfast, plus a smoothie. Nothing wrong with cold cereal, but something hot and homemade fills them up more and gets them through the day a bit better!
 Blend the orange juice, milk, coconut oil and egg in bowl...
 Add all other dry ingredients plus the orange peel... (save the orange, either eat it with the bread, of finish peeling it and throw it in your smoothie for the morning! ;))
 Stir it all up!
 Pour in loaf pan and sprinkle with cinnamon and sugar... and bake!
 All done, boy did it smell GOOD!! SOOOO wish this was a scratch and sniff picture! You'd be running to your kitchen to make up a loaf right now! ;)
 The top, sooo good! I think I liked the top part the best! ;)
Orange Bread
1 cup whole wheat flour
2 cups white flour
1/2 cup sugar
2 tablespoons grated orange peel
2 teaspoon baking powder
3/4 cup fresh orange juice
1/2 cup milk
1/2 cup cooking oil (I used coconut oil)
1 egg beaten
Top of bread you will need:
1 tablespoon sugar
1/2 teaspoon cinnamon
Preheat oven to 350 degrees.
Combine orange juice, milk, oil and egg in a medium bowl. Whisk until smooth. Add both flours, sugar, orange peel and baking powder. Stir until well moistened. Pour batter into a greased loaf pan. Sprinkle with the sugar and cinnamon.
Bake 60-05 minutes or until toothpick inserted comes out clean.
*This is soooo good! I got it from my MCC, More with Less. It calls for 3/4 cup sugar, but I only put in 1/2 and it was just fine! :) also calls for cooking oil, and I substituted coconut oil. A for sure make again!!! ;)
Subscribe to:
Posts (Atom)