Wednesday, January 19, 2011

Morning Glory Smoothie

Oh my goodness! This was one MESSY smoothie! Ok, well, maybe messy isn't the right word? Ok, let me try this again... Once my kids had drank a few sips THROUGH a straw, one of them smiled at me! So I smiled back, but then I did a double take... I said, open your mouth and let me see your teeth. So she did, and oh my, all of my kiddos teeth were PURPLE!!!!!! I kid you not! It was too funny! I am kinda glad that it wasn't a church day, it took a couple extra minutes of scrubbing their teeth to get them to look good! But, ya know what, it was all worth it!


This recipe also has 3 ingredients you don't have to add if you don't want, or don't have them. Honestly, I only had the one ingredient and that's because I got it from the Amish Farmer's Market to try it!


Place orange, yogurt, cranberry juice, frozen blueberries, frozen banana, and optional ingredients, bee pollen granules, shelled hemp seeds, lecithin granules in blender or Vitamix

Here are my bee pollen granules. I got these at the Amish Farmer's market this summer! In all honesty, this is the first time I am using them! Either using this or local honey will help with your allergies.


It's a bit pricey, but it's not like you eat the whole jar in one sitting! ;) I am sure I will go through this all and ready for some more this spring! I am so ready to plant a garden and go to some Farmer's Market... Ok, getting to the recipe.... ;)


Morning Glory Smoothie


1/2 to 1 orange
1 cup plain yogurt
10 oz cranberry juice
3/4 - 1 cup frozen blueberries, unsweetened
1 frozen banana
1/2 teaspoon bee pollen granules (optional)
1/2 teaspoon shelled hemp seeds (optional)
1/2 teaspoon lecithin granules (optional)
Place all ingredients into the Vitamix or blender.
Select Variable 1, turn machine on and quickly increase to speed 10 and then to high. Blend of 30 seconds or until desired consistency.

*It took a bit longer than 30 seconds.
You can use pomegranate juice instead of cranberry.
I think I added a bit more than one cup frozen blueberries.
Don't feel like you have to add those last 3 ingredients, I just did the bee pollen.
Pretty easy and tasty!! :D

Spinach and Beef Enchiladas


This is the recipe that I needed that Red Enchilada Sauce for too! ;)

The kids GOBBLED this right up! I am thinking instead of beef, adding some chick-peas or even lentils! Yummy! Then it would be completely meat free, and you could even make your own tortillas so it could even be gluten free! Hmm, the wheels are turning now, guess what I am gonna be trying? ;)

This is really a pretty easy recipe! It doesn't take much to throw together! (But if you don't have any red sauce, it may put you in panic mode for just a few minuets! ;))


Brown your meat and onion

Then once it's browned and you've drained the grease off the meat, add the frozen spinach,


can of diced green chilies, spices,


sour cream and cheese


Stir it all up... Ok, it may not look the greatest right now, but it is soo good!


Put one tablespoon of red enchilada sauce on your flour tortilla


Then add some beef and spinach filling


Roll it up and put seam sound down in baking dish. (you can kinda see that I put a little bit of sauce in the bottom of the pan before adding the enchiladas)


All rolled up and in the pan!


Adding the rest of the red enchilada sauce
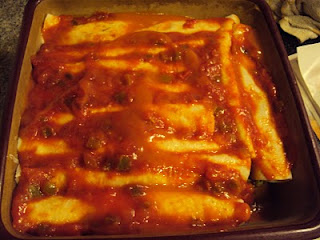

And then added the salsa to the top


Then top off with the shredded cheese
Cover with foil and bake!


opps, I forgot to take a picture of it right after coming out of the oven! My kiddos were hungry and so I was trying to get it all on the plate! Opps!


I put a bit of Jasmine rice down, then the enchilada on top!


Here it is cut open! Oh my, if only this was a scratch and sniff, it is sooooo good!!!!


Spinach and Beef Enchiladas

1 pound ground beef
1 medium onion, chopped
1 box frozen spinach
1 can diced green chilies
1/2 teaspoon cumin
1/2 teaspoon garlic salt
1/4 teaspoon pepper
1/2 cup sour cream
2 cups shredded cheese (you choose what kind, Mexican, cheddar, co-jack, etc...)
1 can (10 oz) red enchilada sauce
8 flour tortillas
1/2 cup salsa

Heat oven to 350 degrees.
In skillet cook beef and onion until beef is brown. Drain the grease.
Place back in skillet and add frozen spinach, cook, stirring frequently, until thawed. Stir in green chilies, cumin, garlic salt, pepper, sour cream and 1 cup of the cheese.
Mix it all together and cook for a few minutes or until the cheese is melted.
Spread about 1 tablespoon enchilada sauce over tortilla. Place your beef mixture on top of the sauce and roll up. Place seam side down in baking dish.
Do this until all your meat mixture is used up. (I used smaller tortillas and I used 10 and could've filled up a few more!)
Once you've got all the tortillas in the pan, take the remaining enchilada sauce and the salsa over the top of your enchiladas. Sprinkle with the remaining 1 cup of cheese.
Cover and bake 40-45 minutes or until heated through.
Serve with rice (we used jasmine rice, yummy!)

Next time I make this, I think I will thaw out my spinach and hand squeeze all the water out! It made my meat mixture a bit watery, but I used a spoon that had small holes in it, so it drained before putting it on my tortilla. (if that made sense?)
Or I may just use fresh spinach, but I would break it up into smaller pieces before placing it in the pan! ;)

Let me know if you try it and how you like it!

Monday, January 17, 2011

Red Enchilada Sauce

I have this bad habit...

Ok, it can be a REALLY bad habit...

I don't always read a recipe all the way through! I know, it really gets me in trouble sometimes! Most of the time, I just add something else, or just make it up as I go!

What can I say? ;)

But tonites recipe, I really couldn't "fake" it tonite! I needed some red enchilada sauce!

Ok, in all fairness, I hadn't "planned" tonite. I had planned out my menu last week, but left tonite open. I like to make Monday "easy-day". ;)

Ok, so back to my recipe...

So the recipe calls for red enchilada sauce, which I did not have.

BUT, I was looking at my Vitamix and thinking what I could do and how I could make some sauce for my recipe!

So I went and grabbed a can of tomato sauce, half of a jalapeno pepper, some garlic, and a few spices... Threw it all in the Vitamix and turned that puppy on high and left it there for about 4-5 minutes til it was heated through and hot!

It turned out really good if I do say so myself! I will prob make it again and tweak it a bit, or if you make it, let me know what you do!

I think I may add a bit of salt to this too...


Red Enchilada Sauce

1 8oz can tomato sauce
2 cloves of garlic, peeled
half of a jalapeno (seeded)
1/4 - 1/2 teaspoon cumin
1 pinch onion powder or onion flakes
1-2 tablespoons flour
1/4 - 1/2 cup water

Place all ingredients in blender or Vitamix and blend until smooth. If using Vitamix, blend for 4-5 minutes or until hot.
If using regular blender, place in small sauce pan to heat until just warm.

If you want it thicker, add more flour.
(I just realized since I was in such a hurry, I didn't take any pictures!! AHHH!!! Sorry, but it really is easy!!!!!!!! :D)

Tropic Tango Smoothie


This is soooo good! I was a little unsure about it, but it's really good!


The kids LOVE it too! So that is a PLUS!!!


The spinach makes it GREEN, but the kids love that as well! They wondered why it was green, they were trying to figure out what was in it... ;) I told them that I put spinach in it, they were pretty excited!


Peeling the lime wasn't the best, but it is worth it!


All ingredients in the Vita-Mix ready to go!!!


Yummy green smoothie! It really is good! (My hubs tried it and he drank it! So, if he drank it, you KNOW it's gotta be good!!! ;))

Tropic Tango Smoothie

1 cup water
1 lime, peeled and halved
2 medium banana's, peeled
1 -2 cups spinach
3 medium apples
1-2 cup ice cubes

Place all ingredients in Vita-Mix or blender in the order listed.

Select Variable 1, turn machine on and quickly to Variable 10, then to High.

Blend for 1 minute or until desired consistency is reached.

If using a regular blender, start on low speed and then increase to High, blend until desired consistency!

This is a GREAT way to start your morning off! It's super healthy and you get that burst of nutrients and vitamins with the spinach in there! ;)

Enjoy!!! :D

A Bit Delayed...

So this week-end my hubs and I were sorting through the kids GAZILLION Legos... So I couldn't really "catch up" or start a recipe... BUT after some running that I need to get done this morning, I will start to post one, so there will be one up today, but just a bit later!

Sorry!!!

Friday, January 14, 2011

Hummus Wraps


I made some hummus the other day for my kids lunch, but I wanted to do something other than just crackers and veggies with it. I was racking my brain as to what I could do with it. I saw that I had some small flour tortillas, then my I was like, hmm, they like refried beans in the tortilla, why not use the hummus and bit of cheese and fry it up!

So that's exactly what I did and held my breath as I tried it. ;) I thought, wow, this is really good! So I served it to all my kids and they LOVED it! They all ate 2 hummus tortillas! Plus the half of a pear I served with it! It's for sure a make again in this house!

Can't wait to try this with different hummus combo's that I make!!!


Place as much hummus as you want on your tortilla

Then add some shredded cheddar cheese, again, as much or as little as you want! I just like the cheese melting out of mine when I make it for me! ;)


Fold up the right side

Then the bottom


Then the left


Then fold the top down


Spread a little bit of coconut oil on the side that has the seams


Place seam side down in frying pan


Then while that side it cooking, spread a little bit of coconut oil on the top
Then flip and cook until cheese is melted or lightly brown!

Serve with whatever else you like! This time I served it with a pear!


The inside...


This is another way you can roll it, and cook the same way!


Hummus Wraps


Tortilla - as many as you want and any kind you want!
Hummus - any kind you want and as much as you want!
Shredded cheddar cheese

Take your tortilla and place a big spoonful of hummus on it. Then put a little bit of shredded cheddar cheese. Roll it up, either way the picture shows, then place a bit of coconut oil on one side of the tortilla. Place the oil side down in the frying pan, heat until the tortilla is light brown. Before flipping it over, spread some more coconut oil on the side that's facing up. Then flip it over until the other side is nice and golden brown, and the cheese is nicely melted.
Enjoy!!!

Thursday, January 13, 2011

Eggs Baked in Ramekins


I got it! I got the Julia Childs cookbook set!!! You know, the Art of French Cooking Vol 1 and 2!!!!! :D It was on sale and I got a gift card, so, guess what I used the gift card on!?!?

I had been looking at these cookbooks for some time now, but didn't want to spend that much money on them... since they were 50% off, and I had the gift card, I thought why not?

So the first recipe I made was this one!

The kids, well, ok, not my youngest, but the other 3 really liked this! They like dipping their toast in the egg yolk!

I did cook theirs a bit longer than the recipe said, I just didn't want all that "snotty" stuff from the eggs, they are a bit picky about that. Maybe I am to blame on that one? I hate "snotty" eggs! I do like the egg yolk, but the rest has to be cooked! ;)

Follow the pictures, it's really easy to make! And it's really good!!! :D

The note in the book says, to make sure you put the ramekins in a pan of boiling water before placing it in the oven... If you don't, the intense heat of the oven will toughen the outside layer before the inside of the egg has cooked... ;)


Place a bit of butter in your ramekin or pyrex


Spread it around with your fingers


This is what mine looked liked! It was a bit messy, but oh so fun!!! ;)


Pour in some whipping cream


Here are all 6 of mine sitting the pan of hot water

All my eggs in there now. Notice I have one with 2? Just so you can see that you can get 2 eggs in one ramekin! ;)


Up close of the egg and cream


Up close of the 2 eggs and cream


Here's the finished product!!! Some whole wheat toasted bread and my egg off to the side, topped with salt and pepper! I'm not gonna lie, it was soooo good! ;)


Eggs Baked in Ramekins

For each serving you will need:

1/2 tsp of butter
1 ramekin 2 1/2 to 3 inches in diameter and about 1 1/2 inches high
2 TB whipping cream
A pan containing 3/4 inch of simmering water
1 or 2 eggs

Preheat oven to 375 degrees.
Butter the ramekin, saving a dot for later.
Add 1 tablespoon whipping cream and set the ramekin in the simmering water over moderate heat. When the cream is hot, break into it one or two eggs. Pour the remaining spoonful of cream over the top and top with a dot of butter.
Place in middle level of the hot oven and bake for 7 to 10 minutes. The eggs are done when they are just set, but still tremble slightly in the ramekins. They will set a little bit more when the ramekins are removed, so they should not be overcooked.
Season with salt and pepper and serve.

The ramekins may remain in the pan of hot water, out of the oven, for 10-15 minutes before serving. To prevent overcooking, remove eggs from oven when slightly underdone.


Now that I am writing this out, I notice that I didn't do one of the steps... opps... I didn't have my pan sitting over moderate heat to heat the whipping cream. I just pour my hot boiling water in the pan and then set the ramekins in the pan. Hope that makes sense? ;)
E-mail me with any questions!!!!
mandysboxofgoodies@gmail.com

Enjoy!!!